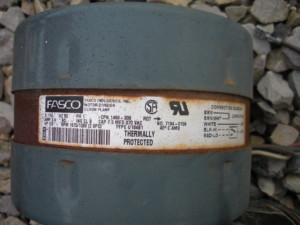
In 9 years of full-timing, having owned a total of 4 Coleman-Mach or RVP air conditioners (two on my current RV, two on the old one), I’ve replaced three blower motors, but never the same one twice. The failure mechanism on all three was the same–the bearings (or bushings most likely) would fail causing the motor to drag to the point of not operating or making loud squealing noises. On two of them, I was able to extend their life by lubricating the bushings, but they still progressively got worse and eventually needed replacement.
In this post I’m not going to address the electrical side of blower motor failures in detail. That’ll be a different post at some point, though the replacement process is the same.
Here’s how to check things out:
- With power off, remove the ceiling assembly. This will vary by model, but should be pretty straightforward. In most cases, such as with the Chill-Grille, remove the air filter, one screw in each corner, and 3 under the filter cover.
- Reach up to the blower motor and spin it by hand. It should have very little resistance, it should be smooth, and there should not be any noticeable slop either up-and-down or forwards-and-backwards along the motor shaft. If there is, you’re going to need a new motor, either now or in the near future.
- In some cases, the motor may seem fine mechanically, but hums instead of spinning when you turn it on. With the ceiling assembly still off, turn power back on. Being very careful not to get your fingers where they could get pinched, give the motor a nudge in the right direction to see if it starts going. If it does, that tells you that the motor’s run winding is fine electrically, and you’re into a problem with the start capacitor and/or winding. In other words, if you’re in this position, don’t replace the blower motor yet.
- Head up to the roof with a camera and remove the outer cover. Get a good picture of the label on the blower motor.

Here’s where things get a little interesting. There are several part numbers on the label. At the far left, you’ll see E4203, there’s a number 1468-306 in the middle, which is the OE part number, and then 7184-0156 just above and right of the words “THERMALLY PROTECTED”. The last number is the one we want. Of course, yours may not be the same number, but the process still applies.
Head over to the FASCO motor cross reference web site, and search for your motor. Here’s what came back for mine:
| FASCO Part Number | OEM Part Number | Notes |
|---|---|---|
| D1092 | 71840156 | DIRECT REPLACEMENT |
The FASCO part number on the left is the one you’ll want to make note of, as that’s what you’ll be looking to buy. Search however you’d like–Google, local motor supply houses, etc. For this one at least (on all 3 replacements so far–one AC unit made in 1991, and 2 made in 2004), I’ve consistently found the best deal on Amazon, and since it’s Prime eligible you get quick delivery, and it can be had next day for only a few bucks more. If you look through the reviews and questions there, you’ll see that Coleman/RVP has used a ton of different part numbers for the same exact part.
Figure out which motor you need and get it on the way. Part 2 will be up shortly to show how to replace the motor.
One Comment Add yours