I mentioned in the previous post that a new battery monitoring system was going to be built to allow use of run-of-the-mill charging equipment, and that it’s cost would be less than $100. It’s also going to be internet connected–we’ll be able to log state of charge, voltage, and a number of other performance metrics to a Google spreadsheet if we want (and that’s easier than it might sound). How do we do this?
Enter open source hardware. You might be wondering what that could be, or how it might be useful. You might be familiar with open source software, with Linux being perhaps the most well-known (and complex) example. Both revolve around publishing what would normally be kept secret: source code in the case of software, drawings and other design documents for hardware. Neither concept is new, but both have benefited significantly with the internet as a sharing medium. With open source software and hardware, the basic idea is that the product is shared freely, usually on the condition that derivative products are also shared, or at least give credit to the source. Users (even if only a small fraction of them) contribute to improving the product, may make copies of their own, and incorporate a design as a component in something new.
Just in the last several years, there has been an explosion of open source hardware available to the average Joe, particularly in the electronics field. Small microcontrollers, packaged with software to make things easy for a beginner, are available everywhere from specialty sellers to Amazon and RadioShack (if you can find one still open). We’re going to use one such controller for this project, the Particle Photon. It’s a $19 board that has 8 digital I/O ports, and 8 analog I/O ports, which will be plenty for taking care of the battery. It also has a Wi-Fi chip on-board, and can be programmed over the internet. This means we can store data and monitor things externally, but it’s also a big benefit while developing the software–we don’t have to connect a cable between the controller and a computer if we need to update the software.
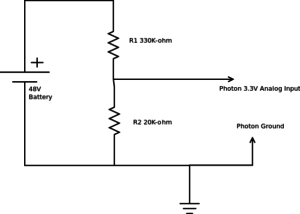
At the most basic level, we need to monitor battery pack voltage. How do we do this with 48V battery pack and a microcontroller with inputs that range from 0 to 3.3V? The simplest circuit makes use of a voltage divider:
What we want to do is scale the voltage measured on the 48V pack down to one that fits inside the range of the 3.3V input. Voltage drop across the resistor is proportional to resistance, so at 48V at the battery, R2’s voltage is
[math]V_{R2}=V_s*{R2} / (R1+R2)=48V*(20kΩ)/(20kΩ + 330kΩ)=2.74V[/math]
That utilizes most of the available input range, but still allows us to measure voltages up to 57V, which is important as that’s just above the open-circuit voltage of the charger we’ll be using. Our analog input has 12 bits, or 4096 steps. That means that each step translates to 0.014V, which is plenty for what we’re trying to do.
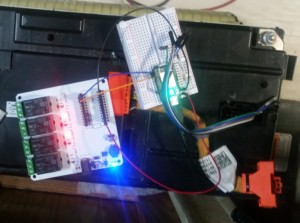
The math gets us a theoretical measurement–we’ll still need to calibrate our measurements, and can use the 5V and 3.3V pins on the controller to get started. Very conveniently, GM has connectors with direct access to each cell available on top of the battery modules, and the pins mate with the cables we’re using with our breadboard. A little probing with a voltmeter gets us a pin out diagram.
Now we have a circuit, ugly as it may be. But we want to be able to see the voltage being measured. Without getting in to the details of programming one of these boards (which is really easy compared to just about anything else I’ve encountered), we need to do two things:
- Read the data from the analog input
- Convert that integer data into a calibrated voltage
The first is easy–we call the analogRead function, referencing which input we want to read. The second involves just a little algebra–we’ve stored the values read from the input with a 0V (ground) reference, and with a measurement from the battery compared to a voltmeter. battV1_HVref is the reading from the battery, and HVref is the measured voltage (with a separate meter).
int data1 = analogRead(battV1);

double V1 = double(data1-battV1_0ref)/double(battV1_HVref-battV1_0ref)*HVref;
Now we get in to what we want to do based on that measurement. Unlike most existing systems, we’re going to treat charging and discharging as two separate systems. For the time being, we’re going to just operate two relays on a relay board our controller plugs in to, but those relays could also be used to control multiple contactors/disconnects.
Let’s start with charging. We want to charge the battery to a preset voltage, then stop. We’ll wait until it falls a certain amount, then re-enable charging:
  //Enable charging if V1 < maxcharge-delta; disable at maxcharge
  if(V1>=maxcharge) charge = LOW;
  if(V1<=maxcharge-resumedelta) charge = HIGH;
For discharging, it’s effectively the reverse.
  //Disable discharging if V1 < 36V, re-enable at 38V
  if(V1<=mincharge) discharge = LOW;
  if(V1>=mincharge+resumedelta) discharge = HIGH;
We also want to contemplate what happens if we lose our connection between the battery pack and the analog input. Likewise, we don’t want to just start charging a severely over-discharged pack, or connect one that’s overcharged to our RV systems. What we’ll do is prevent charging or discharging if the measured voltage falls outside of a slightly wider range:
  //Disable charging and discharging if voltage measurement is suspect.
  if((V1<mincharge-2.0*resumedelta)||(V1>maxcharge+2.0*resumedelta)) {
      charge = LOW;
      discharge = LOW;
  }
And finally, we have to set the state of the digital outputs:
  digitalWrite(chargeenable, charge);
  digitalWrite(dischargeenable, discharge);
We’ll initialize both charge and discharge relay outputs in the setup section of our code to LOW or off. The board will start this way by default, but we want to wait until we’ve checked all of the above conditions before enabling them.
Oh, and just because this is an internet-aware board, we’ll create a variable that we can query from anywhere in the internet-connected world:
sprintf(resultstr, "{\"data1\":%d,\"V1\":%f,\"charge\":%d,\"discharge\":%d}", data1, V1, charge, discharge);
That will return a formatted string with the raw analog measurement, our calculated battery voltage, and the state of the charge and discharge outputs.
I started writing this post right after I turned the system on with a 10A 48V power supply. I just heard the charge relay shut off, with the pack resting right at 48V as commanded.
This obviously isn’t a permanent setup, and I’ll continue to report on its development. Next time look for a discussion on inverters.


You may have already figured it out, the the last two pins on the Volt Battery modules are a 10 K Thermistor. I used a 10 K resistor and the Arduino 5 Volt regulated power, to read the battery temperature with +/- .1 F. Here is my code for my Arduino to covert to temperature of the battery.
// Read Battery batTemp Subroutine
double Thermistor(int RawADC) {
double batTemp;
// Volt Battery 10K Thermistor
batTemp = log(10000.0*((1024.0/RawADC-1))); // Volt Battery 10K
batTemp = 1 / (0.001129148 + (0.000234125 + (0.0000000876741 * batTemp * batTemp ))* batTemp );
batTemp = batTemp – 271.9;
batTemp = (batTemp * 9.0)/ 5.0 + 32.0;
return batTemp;
}
thx for this John. I have a 2014 chevy volt battery pack running my camp since July 2016. Have been looking for a better monitoring system with battery temp.
Sigh. Off to learn more Arduino stuff I guess.
Hi Dave,
I have my Chevy Volt Batteries installed. Currently doing load testing over night, inverter on, Sat Receiver, and Residential Fridge. I took some picture tonight with cell phone, I still need to update my blog. The link below are are the pictures I took tonight. https://photos.google.com/share/AF1QipPJMbs6lWIoY3wvkJJW2gjsSyFdW49RMr89a2tTxJxBiykAG7PLvxzR0t0M34jAIw?key=MmhVdDdjMkh2TWdLUG5JeGRucGk3QW1adlNvVXhR
That’s fantastic work.
I’m fiddling around with trying something similar for my used RELiON battery bank ( 400Ah ) with a photon, measuring voltage and temperature.
Four questions:
1. I’d like to build a more permanent setup than a breadboard for my photon without soldering the photon to a board. Have you found a socket that fits the photon?
2. How dependent is your voltage divider on the accuracy of the value of the resistors?
3. Would you release at least a full copy of your source code? I’m still struggling with coding this thing, it’s not my strong suit.
4. Have you set up any display to monitor your pack? Can you give us details of that?
Thanks, and good luck with your system.
Eric – If you never solved this you should look at the shields for the photon: https://docs.particle.io/datasheets/particle-shields/