Ok, I know we’ve put a lot of text up with very few pictures. This is where we start actually doing stuff and seeing what we’ve got. This particular battery was purchased from a large recycler near Dallas, Texas, back in October. I was in the area ahead of my first triathlon, and thought that bringing one of these home would be a good way to relax prior to the race.
The experience at the junk yard was pretty good. It was a busy, modern facility, with probably 100 phone salespeople, and a warehouse with literally thousands of engines, transmissions, and other parts sitting on pallets ready to be sold. I had called ahead of time to check to make sure they still had the battery, since it was about an hour’s drive from where I was staying. When I showed up, the salesman I talked to radioed someone a bin location to get the battery, and told him to take a forklift. I pulled around to a loading dock, crossing my fingers that it would fit into my car.
A forklift showed up, with what looked like some sort of small battery computer on a pallet, and a strange look for the salesman. Why did he need a forklift for that? Of course, I started to worry that I’d driven all that way for nothing. They set to finding the donor car, and it turned out the battery was still in it. The car was brought inside and put on a lift, and the battery removed in about 30 minutes. While I didn’t necessarily like waiting around, I did get to see what kind of wreck the car was in. Fortunately, it wasn’t one to affect the battery.
Owing to the relative rarity of these cars relative to everything else that gets wrecked, I noticed that they hadn’t even removed the battery disconnect. That had me just a tad concerned–I wanted to make sure the battery hadn’t been over-discharged. Turns out it was fine, and I took a few minutes to show the mechanics how to access the disconnect when the battery is in the car. It’s something that every hybrid/EV has in some form or another, and really should be disconnected before the vehicle is moved at the accident site.
Now for the second attempt at battery loading. This time I’m getting the weird looks. There’s a 5-foot long, 3-and-a-half foot wide battery on a forklift, and my Mazda6 is what’s waiting for it. Sure enough, it fits and the hatch closes. Only a couple of inches to spare at the top of the T–left-to-right–and less than 2 to the underside of the liftgate.
Even though the battery only weighs about 430 pounds, which would be less than 3 average-sized guys in the back seat, most of the weight is further back. About 200 pounds sits in the top of the T, and the middle section is a little further back than the 3 guys would be. That meant that the car looked to be pretty heavily loaded.
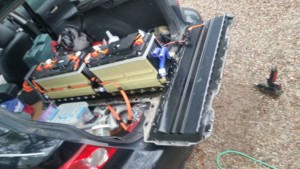
Now here’s where things get interesting. I was alone on this trip, and the picture above was at packet pickup the day before my race. The battery pack would have to exit the vehicle so that I could load my bike for race day. I’m not lifting an awkwardly shaped 430lb battery myself; the plan was to disassemble in place. Fortunately, that proved almost trivial. I say almost because I ended up with an extra cross-brace still attached to the battery. It was bolted to the pack from the underside, and had to come off to remove the battery cover.
That meant lifting the pack in the car, and reaching under the back edge to take those bolts out. Once I figured out that’s what was needed, it was pretty easy. Then it was just a bunch of 10mm bolts to remove all the way around, and a few Torx screws that held the disconnect receptacle to the cover.
That cover is a nice, one-piece composite, that’s both very strong and lightweight. It was easy to handle solo. That left the pack looking like this:
The next step was to remove the flat copper cables that connect each of the 3 battery sections to each other. Doing this first reduces the maximum voltage present from 384V (nominal) to 168V, and only that high on the largest section at the top of the T. The others would be at 96V and 120V.
Now things get a little more interesting. The junkyard didn’t drain the coolant out of the battery pack, and I have to get it out somehow without making the car smell like propylene glycol. The section at the top of the T seemed like it would be OK to go ahead and disconnect. It’s coolant connections were in the middle (between the left two and right two subsections), and up high on the side. I knew some coolant drained out when the battery was pulled out of the car, so this should be fine.
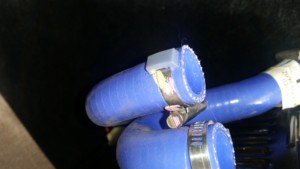
I loosened the hose clamps, pulled the lines off, and didn’t make a mess! Remember how I mentioned the quality of the pack in an earlier post? This is a good time to point out some of the attention to detail, and how GM clearly kept the bean counters busy counting beans for some other project. On each hose, there’s a molded square-ish ring to hold the hose clamp right where it should be:

No fumbling to hold the hose clamp and screwdriver at the same time, and the hose clamp doesn’t fall to the other end of the hose. After disconnecting the hoses, and a couple of connectors for some of the battery electronics, a few more 10mm bolts later I had the retaining bar off of the battery module. It could then be lifted at one side and pulled out of the retainer on the other.

Gravity took care of getting this ~200lb section out of the car, it was a struggle getting it into the RV solo–it couldn’t be carried horizontally and fit through the door with me at the same time.

At this point, it was fairly easy to unbolt the other two battery sections, and with the top of the T propped up, I was able to drain the coolant out of the other end into a catch can without spilling. Those two sections, being considerably lighter, were fairly easy to transport.
At this point, it was time to load the bike, get some sleep and go to the race! Then, from Dallas to Nashville, the battery’s base plate and cover traveled in the car, while the batteries themselves traveled on the bedroom floor. I saved the base plate and cover, and cut them into three sections, that will be reused when mounting the batteries in their permanent home.
Next time, we’ll get into some data collection with the batteries themselves.


