This is when things really start to get interesting. Going into this phase of the project, I knew I’d have a lot of re-measuring to do and was expecting some surprises.

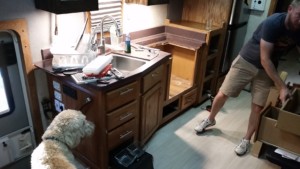
The stove and what was left of the pantry cabinet came out first, followed by the sink. The left end with all of the control panels and switches took some time to carefully disassemble, while still leaving enough hooked up for the RV to function.

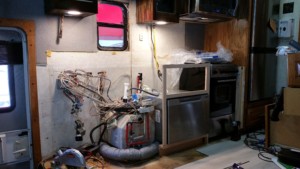
One of the goals getting into this was to clean up a bunch of the wiring, and at the very least get it to a point where someone could reasonably follow what was going on. There were way too many quick splices used, and in many cases daisy-chained one after another. That meant that a number of circuits had really low voltage once a load was applied, causing problems ranging from fluorescent lights not starting to phones not charging.
Since the new appliances had already arrived, you’ll notice that they were being put into the empty spaces almost right away just so we could walk around. They were also used to check and double-check dimensions.
One of the first surprises was seeing how the sink’s drain line was run. As it sat, it would have forced the range out about 6 inches away from the wall, which wasn’t going to work. The end where it went under the refrigerator and into the holding tank didn’t leave much room for reconfiguration. In the end, the fittings at the sink end were cut off, and the pipe angled back closer to the wall. It wasn’t optimal, but it got the stove back even with where the cabinets would be. The spice rack, a Rev-A-Shelf 3″-wide pull-out, would have to stick out to clear, but since it would end up even with the refrigerator this didn’t seem to be a huge problem.
It did mean covering the side of the spice rack though. 3/8″ oak plywood was added on the oven facing side. It might not seem like much, but that turned into a couple of other changes. It shifted the range left, along with the dishwasher. But the dishwasher didn’t have room to go left, as it was butting up against the water heater. That meant getting clever with the face frame design and leaving the DW slightly offset. If you look closely, you’ll see that the 1×2 on its right side is turned so that only the 3/4″ width is between the dishwasher and range.

You can also get a better feel for the mess of wiring, ductwork, and plumbing. In this picture, I had already re-routed the furnace duct–previously it ran over the top of the water heater, now it runs in front. The drain plumbing would go through a few iterations before I got the setup I was after–I wanted to maximize the open space in the cabinet, and had to tie in to pipe at an odd angle. A lot of the freshwater piping was eliminated–what they were thinking when it went in I’ll never know, but they kept it really close to the wall and tucked around the water heater opening. That was always where it froze first in winter. I lost count of the elbows that came out.
You can also see the spice rack, range, and dishwasher at least partially installed. The dishwasher is a Fisher-Paykel single drawer, and the taller of the two form factors they make. Not wanting to spend between $700 and $1,000, I looked for scratch-and-dent stuff. It ended up an eBay purchase, and with freight was about $500. I was using this thing as soon as it was installed, and it’s been running about every other day. The project was a success as far as I was concerned as soon as this was operational. There are far fewer dishes that end up in the sink, I don’t have to wash them myself, and the drying rack isn’t a permanent fixture on the counter any more.
The range and microwave were sourced from AJ Madison–one of the best places to see virtually every appliance on the market–and for those two, they also had the best price. The range is made by Avanti. I picked it for its size (20″ wide), having a true (“waist high”) broiler and storage drawer, and price. So far, I’ve been very pleased with it, though if I had to complain it would be to say that I wish low was lower on the stove top burners. All of the appliances will get a more in-depth review once I’ve used them a little bit more.

The countertops are actually a workbench top ordered from Grainger Industrial Supply. I paid almost twice as much (~$400) as what Lumber Liquidators wanted, but Grainger delivered to me next-day, where LL wanted 3-6 weeks. They were also prefinished from Grainger, and a little bit thicker (1 3/4″ instead of 1 1/2″).
Compared to a laminate or solid surface top, this was easy to work with. The notch in the top over the dishwasher section was started with a 3/4″ hole at the inside corner, then cut with a circular saw and Kreg Rip-Cut jig.

I definitely wanted an undermount sink, and wanted a reveal large enough that the cutout would sit on the sink rim. With a constantly curving border and the need for a narrow kerf, that pretty well meant that the jig saw was the tool for the job. Remember how I mentioned that the Grainger tops were a little thicker? They would be at the very maximum that the jig saw could handle, but we got the job done. A little bit of sanding and squaring things up with a router bit finished the opening up.

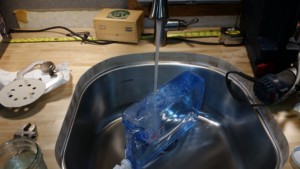
I went back and forth while planning the new layout on whether to buy a new sink or re-use the old one. The old one was okay, still in a like-new state, but it was pretty shallow with center drains. I wanted the drains at the back to keep the plumbing out of the way, but I also wanted a deeper sink. I didn’t want to lose more counter space though, and double-bowl sinks less than 27″ wide are pretty hard to come by at a reasonable price. This one was ordered from Amazon, and does the job well enough. The water jug in the picture didn’t fit at all in the old sink. Installation of this sink was made easy with the butcher block countertop. Screws from the underside start easily, and hold it well.
Now back to wiring. I’ve introduced the topic of switches in another post, and here’s where that method is being put to work. All of the switches are now the same type (Carling Contura II), with different color lenses for different functions, and arranged in one group just inside the door where they will sit behind the pull-out countertop. The heights for the two main rows of switches were set to that they’d line up in between drawers, so that the drawers could extend further back–they ended up at 25 inches deep! The shallower controls for the leveling jacks sit in the middle, where they don’t interfere with the drawers, and the awning controls have been replaced with a single on-off switch and 2 momentary switches to control the individual awnings. It’s a little hard to see in the pictures, but every wire is now labelled with what it controls, and all of the quick splices (at least in this area) have been eliminated.

There’s still a little bit of work do be done, mainly to mount a new pilot light for the water heater (and clean!) to be able to call this panel finished, but it has come a long way from where it was.
More on getting things finished up in part 4.

2 Comments Add yours