Several years ago, I posted a list of tips for managing water in cold weather. My intention at the time was for a follow-up on one of them shortly after, one that “primed” the hot water lines to reduce water usage, and periodically recirculated water in cold weather to prevent freezing. I put my version of this recirculation project in service in 2013, and haven’t revised in the seven years since. I guess that’s a sign that it’s worked well enough. It’s time for an update, and a brief how-to for implementing it yourself.
Recirculation? Why?
Hot water recirculation systems have been somewhat common on larger and high-end homes for some time. Their purpose is to reduce the amount of time you have to wait for hot water to reach a faucet, a goal accomplished by pumping hot water through the supply line before you turn the faucet on. Usually these systems rely on a dedicated pump, either constantly running or running on a timer during times when hot water is likely to be needed. Less commonly, these systems rely on manual activation.
In a typical house recirculation system, there’s no unpressurized holding tank, and no pump already in the system. It’s also rarely practical to add the return line necessary for a complete recirculation loop, so many “under-sink” systems simply pump water from the hot water supply line into the cold water line, using the cold water line as a return to the water heater. That gets you hot water, but at the expense of having some hot water in the cold water line.
In an RV, the cares about wasting and waiting for hot water are more acute. While you’re running the shower waiting for warm water, you’re both depleting your fresh water supply and filling up your holding tank. Even if hooked up to city water and sewer, some of that water that goes down the drain reduces the amount of hot water left in the water heater to keep your shower comfortable.
Another motivation (though not so much this time of year) in an RV is helping prevent freezing. In cold weather, there’s inevitably a vulnerable spot more prone to freezing than the rest of the plumbing. You’ve no doubt heard advice about keeping a faucet dripping to prevent freezing, but that has its limits. It wastes limited water and fills tanks.
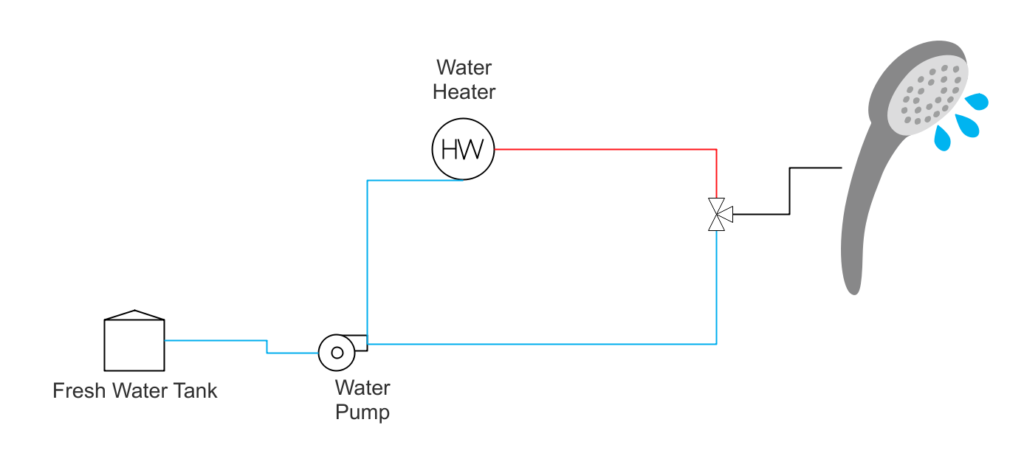
In an RV, we have the benefit of a pump and freshwater tank that make the system simpler and less expensive than in a house. Note the layout above–we have a pump already. But it’s not recirculating, it’s pressurizing water from the freshwater tank. If we had a line running back to the tank, it would recirculate, but the pump would run constantly. You might be able to get away with a valve in that line, just barely cracked open, but there’s a better way. We’ll install a solenoid valve (i.e. one that opens and closes with electrical power) along with a timer circuit so that it only recirculates at certain times.
Planning
This is perhaps the hardest part of the project. You’ll need to figure out where it makes the most sense to connect to a fixture’s supply, and connect back to the freshwater tank. Start at the water pump, and trace the route to the water heater. Then follow from the water heater to the last fixture supplied.
Ideally, the water pump outlet feeds cold water to each fixture (toilet, sinks, shower, etc.) on the way to the water heater, and the water heater supplies hot water to each fixture retracing the same route, ending with the fixture closest to the water tank. With a little more wishful thinking, that plumbing is all easily accessible.
Ultimately, you want to make sure water moves through as much of the plumbing as possible for freeze protection, and moves through the hot water line to the fixture you care about (usually the shower) if saving water is the main goal.
Note where you intend to connect, and begin looking for a route back to the freshwater tank.
Look for Tank Fill Line
If you’re not seeing a direct route to run a line from the fixture of choice to the fresh water tank, try to find the line for the tank fill. If that’s closer than going all the way to the tank, it can be less work to tie in to that than to run a new line all the way to the tank.
Locate Source of Power

The cycle timer needs power, and will need to be able to route power to the solenoid valve. If you want to “prime” your hot water lines before hopping in the shower, one option is to use the switch for the bathroom light–if you switch the bathroom light on, the valve opens and recirculates while you’re getting ready to hop in. You may also want a separate switch for leaving the cycle timer on in cold weather, if you don’t want the light also on.
Shopping List

- Hook-up wire (16 AWG stranded wire, preferably white and one or two other colors)
- Plumbing Fittings and pipe/hose
A quick note about plumbing fittings: if you’re trying to make connections in a tight space, consider using a pair of add-a-tee fittings and a dishwasher supply hose with 3/8″ compression fittings.


Installing the Recirculation Loop
Plumbing Connections
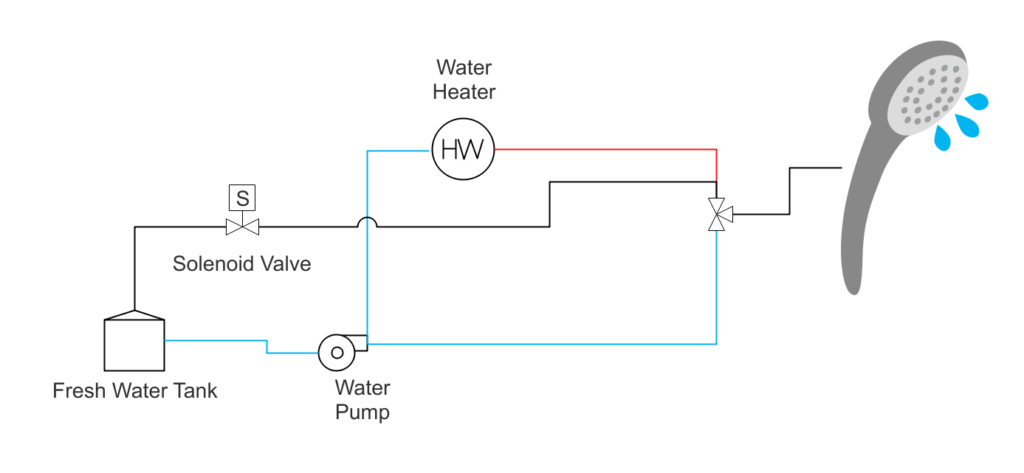
Let’s revisit the figure above. We’re adding the black line between the hot water line near the shower and the freshwater tank fill line (or other connection that allows flow into the tank).
Obviously, turn off the water before disconnecting or cutting anything, and make sure to relieve any pressure. Open the nearest faucet, and if available, any low point drains.
If you’re using an Add-A-Tee adapter, unscrew the shower’s hot water supply line and connect the adapter. Do the same for the line supplying the freshwater tank. Fish the supply line between the two, but don’t connect it just yet.
Install a pair of male 1/2″ NPT to male 3/8″ compression fittings on the solenoid valve, making sure to use thread sealing compound or tape on the NPT threads. Use a short hose with 3/8″ compression fittings to connect between the Add-A-Tee adapter and the solenoid valve, and connect the longer supply line between the solenoid valve and the tank.
Note that placing the valve anywhere along the path between the fixture (shower) and the tank will work, but I prefer keeping it close to the shower so that the line is not normally pressurized. Consider where you’ll be able to make the necessary electrical connections in choosing where to place the valve.
If you’re not using the adapters above, it’s just a bunch of ordinary plumbing connections, most likely with PEX fittings and a crimper.
At this point, with everything connected, you can turn the water back on. Functionally, everything should be just as it was before you started, just with an electrically-controlled valve you haven’t hooked up yet.
Electrical Connections
For the purpose of this description, I’m assuming that the bathroom light switch will be the source of power for the system. It doesn’t have to be, but probably represents the lowest-effort installation in most cases.
To minimize the time you’ve got power turned off, we’ll work from the right side of the diagram, connecting to switched power last.
Start by making a connection to a good ground, and connecting that to both terminal A2 on the cycle timer and one of the two wires on the solenoid valve (which one doesn’t matter). Terminals A1 and A2 supply power to the timer, and allow it to open and close the relay inside.
The remaining wire from the solenoid gets connected to the terminal labeled 28, which is normally open. It gets connected to terminal 25 when the cycle indicator is active.
When that happens, we want power going to the solenoid valve, so we need 12V supplied to terminal 25, and we need power to terminal A1 to power the timer. Connect a short wire to each of those terminals, then connect them with a third wire to run to the bathroom light switch.
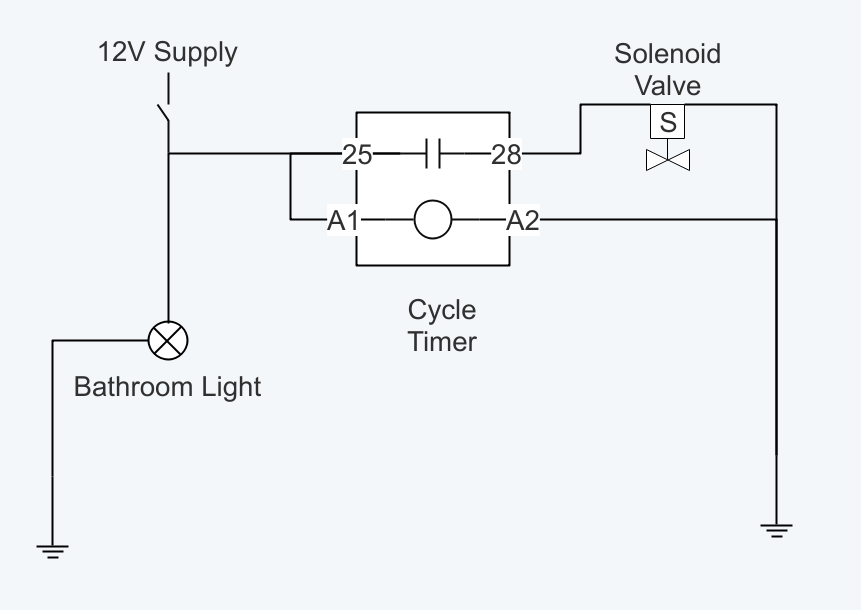
With these connections in place, when the bathroom light switch is turned on, the relay controlling the solenoid valve will close and the valve will open, allowing water to flow through to the freshwater tank.
After the time t1 elapses, the relay opens and the valve closes. It will remain closed for time t2 before turning on again so long as the bathroom light switch is on. If the switch is turned off, the cycle is started from the beginning, turning on for t1, then off for t2.
Setting Time Intervals
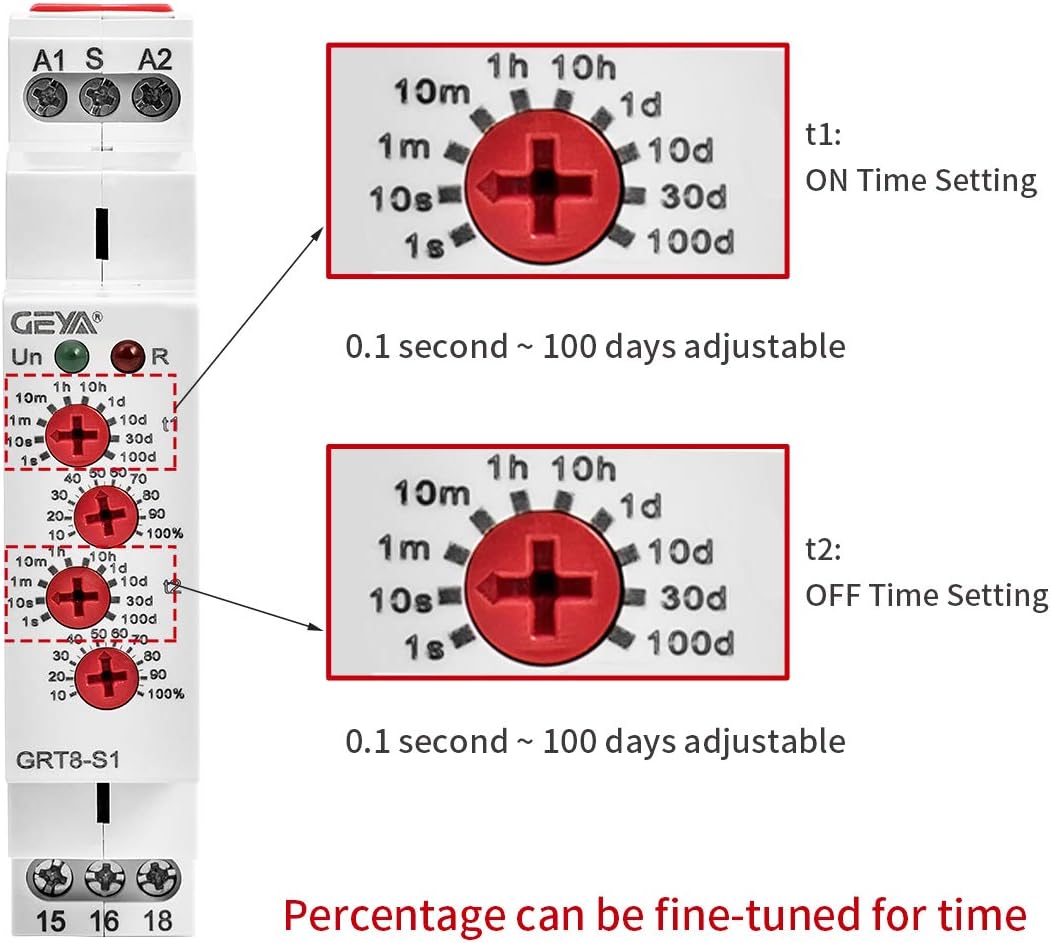
For each of the intervals, t1 and t2, there are two dials to turn. The first sets a scale, the second sets a fractional multipler of that scale. This allows setting a time interval with precision appropriate for the length of the interval.
For t1, we want the time to be just long enough to get hot water from the water heater to the fixture. This time will depend on your plumbing layout, but approximately 30 seconds is a reasonable starting point. Set the first dial to 1m, and the second dial to 50% to get a 30-second interval.
For t2, we have two constraints. We want t2 to be short enough that in cold weather the water moves often enough to prevent freeze blockages. But we also don’t want it to be so short that it activates a second time while showering. Once an hour should be enough in most cases. Set the third dial (the t2 scale) to 1h, and the fourth dial to 100%. If you wanted a slightly longer interval, set the scale to 10h, and 15% to get a cycle every hour and a half.
Using the Recirculation System
When you’re about to take a shower, switch on the bathroom light. You’ll likely hear your water pump run, or city water flowing, along with thud when the solenoid closes at the end of the cycle. When you hear that, you should be able to turn on the shower and have hot water almost instantly–the only cold water will be what’s in the short length of pipe/hose between the tee for the recirculation line and the showerhead.
In cold weather, leave the switch turned on. The cycle timer will open the valve every time the t2 interval elapses, recirculating water back to the tank. While you may still experience freezing at fixtures where water isn’t able to move with this loop, you should be confident that you’ll always be able to get hot water at the shower. When you get ready to take a shower in cold weather, briefly turn the switch off and back on to force the recirculation interval to run right before you hop in.